WWW.PESCUIT.TK
BINE ATI VENIT PE FORUMUL PESCUIT.TK
VA RUGAM SA VA INREGISTATI PENTRU A AVEA ACCES LA TOATE CATEGORIILE FORUMULUI.ESTE GRATIS , NU NECESITA VALIDARE SI DUREAZA DOAR CATEVA SECUNDE...
|
Lista Forumurilor Pe Tematici
|
WWW.PESCUIT.TK | Reguli | Inregistrare | Login
POZE WWW.PESCUIT.TK
Nu sunteti logat.
|
Nou pe simpatie:
princess79 pe Simpatie.ro
 | Femeie
25 ani
Bucuresti
cauta Barbat
25 - 60 ani |
|
|
blackwind
Administrator
Inregistrat: acum 18 ani
Postari: 262
|
|
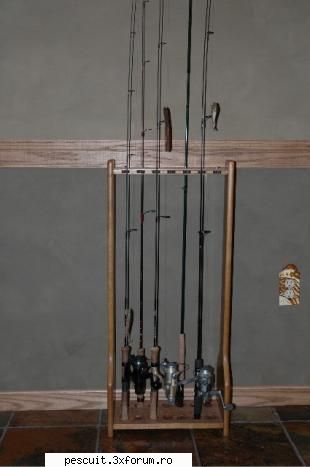
Am gasit un articol interesant de Peter Fiduccia referitor la constructia unui suport pentru lansete foarte practic si usor de realizat.
Este in engleza dar este usor de inteles iar pozele spun totul.
I have a pet peeve about storing my fishing rods. They have to be in a secure rod holder or I get very nervous about their safety. I have had too many of my favorite rods broken because they were laid or placed in a spot that made them venerable to being damaged.
I have a large collection of fly rods that include some very old Fenwick rods (remember their slogan Im a Fenwick man?) and some more modern rods that include Sage, G-Loomis, Orvis, and even a custom made Chattahoochee Bamboo fly rod. I also do a lot of small creek and stream fishing and have a dozen 46, 5 and 56 ultra-light spinning reels and rods as well. All of which are stored carefully on my rod racks.
Not only does the rack provide a safe storage area for your rods but it also adds ambiance to any room they are placed in including a trophy room, den, library, or game room.
They also announce to guests that you are an avid angler who loves to fish and knows how to properly store his rods as well.
I take great pride in my rod racks because they hold the equipment that I get so much enjoyment and memories from. I can vividly remember placing my son Codys first brand name rod in one of my racks. It made Kate and I feel so proud that he enjoyed fishing as much as we do. It also made us feel good to see him understand the importance of taking care of his equipment (at the time Cody was 12 years old).
I enjoy showing off Leos talent as well. Everyone who sees this unit remarks about how nice it is. I tell them that it is not only a handsome rod storage rack, but it also is a nice looking piece of furniture too.
The rod rack is made from edge glued and screwed oak. It holds your rods in an upright position, and spacing is wide enough to store the pole with the reel attached.
It eliminates storing your rods in cases, or on hooks in the garage or worse yet lying flat in the rafters of the basement, barn or attic. After building this unit you can place up to 12 of your most cherished rods vertically, safe, and within easy reach.
It can be made to hold any number of rods. I have included instructions for making a twelve (12) fishing rod rack. You can change the size accordingly if you want more or less slots for rods. To give it a furniture type finish it should be stained with your choice of color, varnished, and or waxed depending on your choice.
17.4KB
_______________________________________
|
|
| pus acum 16 ani |
|
|
blackwind
Administrator
Inregistrat: acum 18 ani
Postari: 262
|
|
Tools/Power tools used
Table saw; drill with 1/16 drill bit and 1 ¼ wood bit or hole saw; jig saw; belt sander; drum sander; and screw gun.
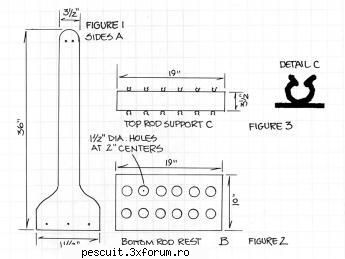
OVERALL SIZE:
36 HIGH
11 ½ DEEP
21 ½ Wide
Cutting List
Key
Part
Dimensions
Pcs.
Material
A
Sides
¾ x 11½ x 36
2
Oak
B
Bottom rod rest
¾ x 10 x 19
1
Oak
C
Top rod support
¾ x 3 ½ x 19
1
Oak
Materials: Wood glue, 1 ½ wood screws, mushroom-style button plugs, finishing materials; 12 rubber rod holder clips; Four ¾ L metal brackets.
Note: Measurements reflect the actual thickness of dimension lumber.
Authors Note: Finding the rubber clips that get screwed or glued into the wood to hold the rods can be difficult. They are not available everywhere. I located them by doing a search on Google that lead me to eBay. After purchasing them through this outlet I did happen to find a traditional hardware store (crooked wood floor and all), in Florida, NY that also had similar rubber holders that would work.
Directions:
Fishing Rod Holder
Make the sides (A).
1. Cut the sides (A) to length and overall width using table saw as shown in the cutting list.
2. Using the pattern shown in figure one draw the actual shape on a piece of oak-tag or brown paper based upon the scaled dimensions. For the pattern shown one square equals one inch. Trace the pattern onto piece (A).
3. Cut the outline with a jigsaw and smooth the cut with a drum sander, belt sander, or by hand. Trace the finished profile onto the other side, and make the cutout.
4. Pre drill 1/16 holes in both side pieces at locations as shown in figure 1.
5. Drill 3/8 counter-bored holes ~ ¼ deep into the same locations as shown on the outside of both side pieces.
Make the top rod support (C) and bottom rod rest (B).
1. Cut the overall length and width of both the top rod support (C) and bottom rod rest (B).
2. Measure and mark the 12 bottom rod holes (see figure 2). Drill the holes ¼ deep using a 1 ½ wood bit or hole saw.
3. Measure and mark the location for the six rod support holders onto the front edge of the top pole support. Refer to figure 3. Repeat for the opposite side.
4. Secure the rod support holders in the locations using a screw gun.
Assemble the top and bottom to the sides.
1. Use four cabinet clamps, clamp the sides to the bottom and top. Both bottom and top pieces should be 1 from the top end and bottom end of the side pieces. Use wood glue and mount the assemblies using the 1 ½ wood screws.
2. Mount the four ¾ L metal brackets on the underneath of the bottom rod support to add additional strength to the rod holder using wood screws.
Apply Finishing Touches.
1. Scrape off any excess glue.
2. Sand smooth with a drum sander and apply your desired finish.
3. Install mushroom-style button plugs in all counter-bore holes using a small amount of glue and tap them into place.
16KB
_______________________________________
|
|
| pus acum 16 ani |
|